顯示具有 OpenStack 標籤的文章。 顯示所有文章

2018年4月18日 星期三

[OpenStack][GPU] OpenStack對於GPU的支援

目前OpenStack對於GPU的支援作法

  • PCI passthrough
    – Nova VM-based compute (e.g. Libvirt+KVM) with PCI passthrough
  • Ironic
    – 透過ironic設定含有GPU的compute node
  • CPU pinning、NUMA
  • vGPU
  • RDMA(Remote Direct Memory Access)
    – 透過一台主機上的網路卡API存取到另一台主機上的記憶體之技術

vGPU

目前若cpu有支援intel GVT-g,就可以支援全虛擬化的vGPU, 雖然效能略低於PCI passthrough,但可以多個VM間做sharing (up to 15)


[vGPU的啟動方法]
Nova
1. 於nova-compute啟動GPU type
[devices]
enabled_vgpu_types = nvidia-35
2. 於nova controller設定flavor
Configure a flavor to request one virtual GPU:
$ openstack flavor set vgpu_1 --property "resources:VGPU=1"

RDMA(Remote Direct Memory Access) 


GPU on K8S

  • 於K8S 1.10開始支援nv-docker
  • 一個pod會吃滿一張GPU卡,無法切分


[參考資源]

[OpenStack][kolla] Kolla於Queens/Rocky版的發展特色

Kolla於Queens/Rocky版的特色,簡單整理如下:

映像檔建置輕量化

  • 於Queens版的docker映像檔建置開始支援squash layer,可把多個docker image layer合併成一個
  • 而於Rocky版預計會實現docker的multi-stage build
  • 透過上述技術可讓映像檔的建置更加透過分層建置及reuse來達到輕量化的目的,以減少映像檔的建置跟傳輸時間。

Ceph的支援度更顯明顯

Rolling update

  • 部分服務開始支援最小downtime的upgrade
  • 目前於Queens版已經完成Keystone以及Cinder的部分,其它將於Rocky版實現中

開發者模式

  • Queens版正式支援"開發者模式"的部署方式(從pike版開始已經開始有這些features)
  • 透過*_dev_mode=true的設定,可以將各專案的原代碼主目錄直接與container內部路徑做綁定,
    讓開發者可以直接修改。

Healthcheck及監控服務支援

  • 之前kolla有嘗試過支持一些監控方案,但效果不是很理想
  • 隨著promethus的成熟,kolla社群預計於Rocky版提供promethus監控
    目前的設計會朝向promethus+alertmanager+ gnocchi的方案,
    promethus用來做數據收集、alertmanager來做告警、gnocchi用來做監控數據的儲存。

DB的備份任務支援

  • 預計將於queens/rocky版來做

Vitrage的支援

  • 目前已於queens版新增vitrage的部署。
  • Vitrage是OPENSTACK的RCA(Root-Cause Analysis)專案,可以處理OpenStack內部的告警、事件等,
    並經由統一分析後於dashboard呈現報表,方便OpenStack之維運。

Blazar的支援

  • queens版新增blazar的部分,該服務是做資源的預定,使用者可以在一段時間內申請資源的保留(reservation),
    以便後續使用。

其它細節可參閱:

2018年4月16日 星期一

[OpenStack][DevStack] Devstack pip套件版號注意事項


最近在安裝pike版的devstack過程中,發現devstack怎都安裝不起來。然後從log發現pip會安裝到最近pypi.org上所最新所釋出的pip 10,於是發現了以下有趣的程式碼片段:

pip_version=$(python -c "import pip; \
print(pip.__version__.strip('.')[0])")

https://github.com/openstack-dev/devstack/blob/stable/pike/inc/python#L336

這個pip.__version__會經由strip('.')去掉字串頭尾的dot(.)然後印出版號,像是'9.x.y'。 這個版號字串在<10的話不會怎樣,但是在新版10的時候就會變成1,這樣會悲劇阿,導致整個安裝過程會爆炸。以下是小弟的測試過程:


>>> import pip
>>> pip.__version__
'9.0.3'
>>> pip.__version__.strip('.')
'9.0.3'
>>> pip.__version__.strip('.')[0]
'9'
>>> x='10.0.0'
>>> x[0]
'1'
>>> pip.__version__.split('.')[0]
'9'
>>> x.split('.')[0]
'10'
>>>  
所以應該是要用split('.')來切割,取得大版號才對啊(是否strip()跟split()會傻傻分不清楚<_._>)。正在討論是否要進行bug回報的部分,但看到社區已於新版修復,可以參考以下的連結

  2. https://github.com/openstack-dev/devstack/commit/f99d1771ba1882dfbb69186212a197edae3ef02c

[OpenStack][Kolla] 如何用kolla建置及部署OpenStack

[Kolla簡介]
          Kolla一開始為TripleO專案的一部分,但它跟TripleO的不同是,它是基於Docker container來deploy OpenStack。而Kolla於ocata版已拆分為kolla和kolla-ansible/kolla-k8s兩個部分:
  • kolla: 用來建置production-ready images
  • kolla-ansible/kolla-k8s: 用來部署containernized OpenStack


[如何產生kolla-build.conf來建置kolla映像檔]
  1. 安裝tox: sudo pip install tox
  2. 切換至kolla專案主目錄: cd kolla/
  3. 產生kolla-build.conf:  tox -e genconfig  #預設會放在etc/
  4. kolla-build.conf配置檔設定
    • 從source建置
                    [heat-base]
                     type = git
                    location = https://github.com/openstack/heat.git
                    reference = stable/pike
    • 若要透過proxy建置dockerfile
    - include_header = ./.header # 自訂header檔案的位置
    - include_footer = ./.footer   # 自訂footer檔案的位置
                        [.header檔案內容]
                        ARG http_proxy=http://{proxy}:8080
                        ARG https_proxy=https://{https-proxy}:8080
                        ARG no_proxy=localhost

                        [.footer檔案內容]
                        ARG http_proxy=""
                        ARG https_proxy=""
                        ARG no_proxy=""
     
      [Kolla映像檔建置]
      1. [方法一] python tools/build.py -b ubuntu {{服務}}
        • 例如: sudo -E tools/build.py -b ubuntu glance neutron
      2. [方法二] kolla-build -b ubuntu {{服務}}
        • kolla-build指令可以透過sudo pip install kolla/來安裝


      [Kolla inventory]
      • * network_interface - While it is not used on its own, this provides the required default for other interfaces below.
      • * api_interface - This interface is used for the management network. The management network is the network OpenStack services uses to communicate to each other and the databases. There are known security risks here, so it’s recommended to make this network internal, not accessible from outside. Defaults to network_interface.
      • * kolla_external_vip_interface - This interface is public-facing one. It’s used when you want HAProxy public endpoints to be exposed in different network than internal ones. It is mandatory to set this option when kolla_enable_tls_external is set to yes. Defaults to network_interface.
      • * storage_interface - This is the interface that is used by virtual machines to communicate to Ceph. This can be heavily utilized so it’s recommended to put this network on 10Gig networking. Defaults to network_interface.
      • * cluster_interface - This is another interface used by Ceph. It’s used for data replication. It can be heavily utilized also and if it becomes a bottleneck it can affect data consistency and performance of whole cluster. Defaults to network_interface.
      • * tunnel_interface - This interface is used by Neutron for vm-to-vm traffic over tunneled networks (like VxLan). Defaults to network_interface.
      • * neutron_external_interface - This interface is required by Neutron. Neutron will put br-ex on it. It will be used for flat networking as well as tagged vlan networks. Has to be set separately.
      • * dns_interface - This interface is required by Designate and Bind9. Is used by public facing DNS requests and queries to bind9 and designate mDNS services. Defaults to network_interface.
      • * bifrost_network_interface - This interface is required by Bifrost. Is used to provision bare metal cloud hosts, require L2 connectivity with the bare metal cloud hosts in order to provide DHCP leases with PXE boot options. Defaults to network_interface.
      • 注意如果interface是OVS bridge的話,介面卡代號記得從br-ethX置換成br_ethX (注意是底線),詳細可以透過ansible -m setup -i {inventory} all去抓來看


        [Kolla部署]
              由於目前社群較多人使用的是kolla-ansible專案,所以以下將介紹kolla-ansible的部署指令
        1. 確認inventory
        2. 確認服務的ports是否被占用:  tools/kolla-ansible prechecks
        3. 執行部署:  sudo -E tools/kolla-ansible -i {{環境部署方式之inventory}} --configdir {{環境設定檔資料夾}} --password {{該環境使用密碼檔}} deploy
        4.  Neutron網路配置在kolla-ansible專案中ansible/group_vars/all中修改   
           
        5. kolla-ansible的role service一般在部署會經過register => config => bootstrap => restart service
          • register: 註冊endpoint
          • config: 配置
          • bootstrap: migrate db
          • restart service    
          [kolla-ansible各role的目錄結構]
          • bootstrap: 建立服務用的db,也就是執行*-manage db sync
          • bootstrap-service: 啟動服務用container,但會以前景模式啟動
          • handlers/main.yml : 規範要以背景常駐啟動的服務,主要設定檔及啟動參數都規範於此
          • kolla已自訂撰寫模組kolla_toolbox、kolla_image 於ansible/library來動態載入

          [kolla-ansible支援的操作actions]
          • deploy
          • precheck
          • destroy
          • reconfigure
          • pull
          [kolla-ansible重部署的方法]
          • 手動
            1. sudo docker ps -qa | sudo xargs docker rm -f #清除所有containers
            2. sudo docker volume ls -q | sudo xargs docker volume rm  #清除docker volumes的所有資料
            3. sudo service docker restart # 重啟docker服務
          [kolla-ansible資料庫修復]

          • 當mariadb的galera抱怨連線有錯的時候可以下達tools/kolla-ansible -i {inventory} --configdir {configdir} --passwords {password } mariadb_revory

          [kolla-ansible的腳本演進]
          • 於ocata版本開始,將role的start任務轉交給handler處理,會於deploy.yml中透過meta: flush_handlers來執行


          [kolla的HA]
          [kolla的OVS]

          • OVS BR的設定: https://goo.gl/MHGSWG
          • - name: Ensuring OVS bridge is properly setup
              command: docker exec openvswitch_db /usr/local/bin/kolla_ensure_openvswitch_configured {{ item.0 }} {{ item.1 }}
              register: status
              changed_when: status.stdout.find('changed') != -1
              when:
                - inventory_hostname in groups["network"]
                  or (inventory_hostname in groups["compute"] and computes_need_external_bridge | bool )
              with_together:
                - "{{ neutron_bridge_name.split(',') }}"
                - "{{ neutron_external_interface.split(',') }}"


          [kolla社群發展]


          [kolla常見問題]
          1. Hostname has to resolve to IP address of api_interface 
          TASK [prechecks : fail] ********************************************************************************************************************************************************
          task path: /home/ubuntu/kolla/ansible/roles/prechecks/tasks/port_checks.yml:448
          [WARNING]: when statements should not include jinja2 templating delimiters such as {{ }} or {% %}. Found: '{{ hostvars[item['item']]['ansible_' +
          hostvars[item['item']]['api_interface']]['ipv4']['address'] }}' not in '{{ item.stdout }}'

          fatal: [10.144.192.36]: FAILED! => {
              "msg": "The conditional check ''{{ hostvars[item['item']]['ansible_' + hostvars[item['item']]['api_interface']]['ipv4']['address'] }}' not in '{{ item.stdout }}'' failed. T                              he error was: Invalid conditional detected: EOL while scanning string literal (<unknown>, line 1)\n\nThe error appears to have been in '/home/ubuntu/kolla/ansible/roles/prechec                              ks/tasks/port_checks.yml': line 448, column 3, but may\nbe elsewhere in the file depending on the exact syntax problem.\n\nThe offending line appears to be:\n\n\n- fail: msg=\"                              Hostname has to resolve to IP address of api_interface\"\n  ^ here\n"
          [ANS]
                 此問題常見於Kolla AIO部署上,請嘗試修改remote host上的/etc/hosts,確認被部署機器上api_interface所綁定的網路介面卡如eth0的ip跟hostname是可以互相解析的。

          1. 確認有127.0.0.1 localhost和<mgmt ip> <hostname>這兩行,若不行的話移除127.0.1.1 localhost看看
          2. 若有看到ansible的error,可確認ansible套件版本是否符合所需,N版以前建議ansible <= 2.2 、>=2.1 (目前實驗環境為2.1.6)。另外問了Kolla Reviewer,目前p和q版kolla的版本建議用<2.4的,目前coverage rate最高
          2.  inventory缺少的ansible供裝錯誤
          TASK [nova : Ensuring config directories exist]
          fatal: [10.144.192.36]: FAILED! => 
          {"msg": "The conditional check 'inventory_hostname in groups[item.value.group]' failed. 
          The error was: error while evaluating conditional 
          (inventory_hostname in groups[item.value.group]): Unable to look up a name or 
          access an attribute in template string 
          ({% if inventory_hostname in groups[item.value.group] %} True {% else %} False {% endif %}).\n
          Make sure your variable name does not contain invalid characters like '-': 
          argument of type 'StrictUndefined' is not iterable\n
          \nThe error appears to have been in '/home/ubuntu/kolla-ansible/ansible/roles/nova/tasks/config.yml': 
          line 13, column 3, but may\n
          be elsewhere in the file depending on the exact syntax problem.\n\nThe offending line appears to be:
          \n\n\n- name: Ensuring config directories exist\n  ^ here\n"}
              to retry, use: --limit @/home/ubuntu/kolla-ansible/ansible/site.retry
          [ANS] 檢查一下inventory的group是否有缺失,再來考慮是否是ansible版本問題


          [參考資源]

          [OpenStack][Ironic] Ironic於Queens版的支援特色

          1.      Ironic rescue mode
          Q版開始,ironic也開始支援救援模式(rescue),在救援模式下,用戶可以用rescue password修復instance進行trouble-shooting(PS: 目前nova instancerescue mode,所以ironicQ版也開始支援)

          2.      Traits API支援
          Nova已經開始有Placement功能(一種計算資源註冊調度的追蹤機制),於Q版開始,Ironic也新增traits api,讓traits訊息可以註冊到novaplacement api中。
          Placement API是用來收集不同的物理資源,提供較為詳細的物理資源訊息,並管理查看物理資源的使用分配、以及AZ關聯等等,所以新增traits api後,可以讓Nova那邊有統計調度ironic資源的能力

          3.      Neutron networking-baremetal
          neutorn這邊也開始支援baremetal的部分,初步研究發現有修正port狀態不正常的部分,也提供一些routed network的功能

          [OpenStack][Freezer] OpenStack DBaaS專案簡介

          [Freezer簡介]
          FreezerOpenStack社群的備份專案,幫助使用者自動進行數據面的備份跟還原
          [Freezer的數據備份]
          • File System backup
          • DB backup
          • Cinder backup
          • Nova backup
          [Freezerstorage backup]
          • Swift Object
          • Local storage
          • SSH Storage
          [Freezer特性]
          1. 多平台支援: linux / windows / macos / unix-like
          2. 多元儲存支援: swift / local / ssh remote server
          3. 備份數據的壓縮加密
          4. parallel backup


          [Freezer DevStack安裝]
          enable_plugin freezer-api https://git.openstack.org/openstack/freezer-api.git master
          enable_plugin freezer https://git.openstack.org/openstack/freezer.git master
          enable_plugin freezer-web-ui https://git.openstack.org/openstack/freezer-web-ui.git master

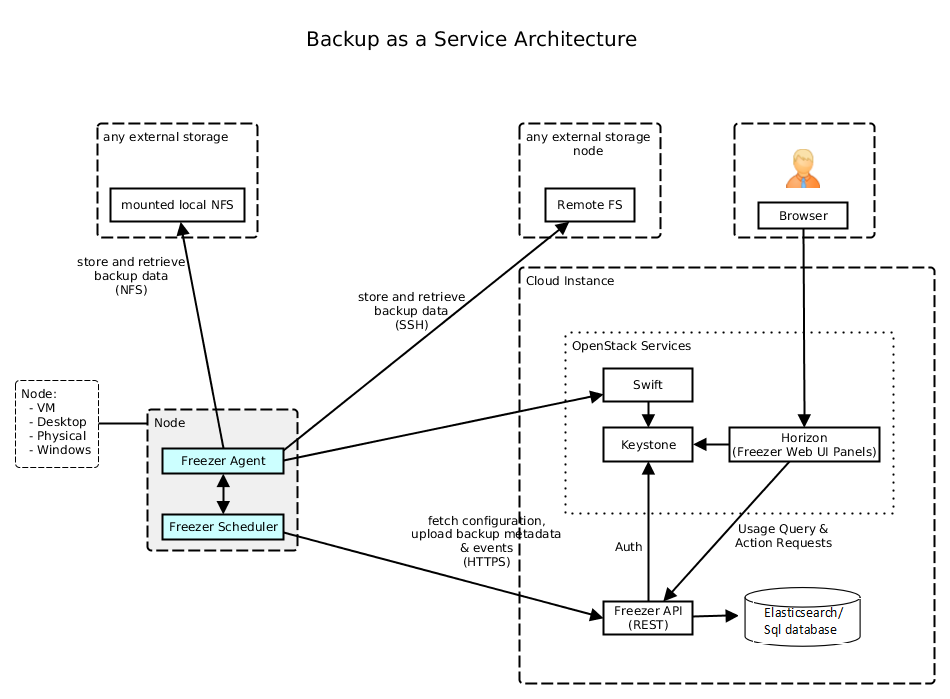
          [Freezer Arch]
          freezer-api service
          Accepts and responds to end user API calls…

          freezer-scheduler service
          Does API calls to freezer-api to schedule, fetch, update or Delete backup jobs.
          • run on the client nodes
          • 與freezer-agent互相搭配工作

          freezer-agent service
          Python application run on the same node like freezer-scheduler and it gets called by freezer-scheduler to execute backups/restore operations.

          freezer-dr service
          Independent service from all other freezer services. It runs on the control plane to do disaster recovery in case of any compute node failed (more to follow)

          2018年4月15日 星期日

          [OpenStack][Devstack] Pike版Devstack安裝

          [部署模式]

          • AIO
          • Multinode
          [Screen操作指令]

          # 重啟DEVSTACK特定服務
          1. screen -dR # restach screen session
          2. CTRL+a+" #選擇你要切換的分頁  [PS: CTRL+a為screen的功能鍵]
          3. CTRL+C #中斷目前服務
          4. 方向鍵往上重新執行剛被中斷的指令
          5. 打完收工 CTRL+d #跳出screen

          [Misc]
          # 重新掛載loop device
          sudo losetup -a  # 顯示目前所有掛載的loop device
          sudo losetup -d <device> # detach loop device
          • sudo losetup -d /dev/loop0
          # cinder loop device
          因為 cinder是使用local file loop device來建 vg,而重開機會讓loop device全部 detach,所以要手動建回來,否則 cinder volume會抱怨找不到lvm
          • sudo losetup -f --show /opt/stack/data/stack-volumes-default-backing-file
          • sudo losetup -f --show /opt/stack/data/stack-volumes-lvmdriver-1-backing-file
          • sudo vgscan

          [Pike] DevStack Changelogs

          1. pike版已用systemd unit的執行方式來運行openstack服務,包含apache2也是  (不再使用傳統的screen)
          2. 表列openstack服務
            • 表列所有devstack的運行服務: sudo systemctl list-units devstack*
            • 表列nova系列服務: sudo systemctl list-units devstack@n-*
            • 同時操作nova服務:  sudo systemctl (status/start/restart/enable/disable) devstack@n-*
            • 同時操作整個devstack: sudo systemctl restart devstack@*
          3. 查詢openstack服務log
            • sudo journalctl -f --unit devstack@<服務>.service  
              • -f: following
            • sudo journalctl -a --unit devstack@<服務>.service 
              • -a: all
          4. Debugging skills
            • Local (以nova-scheduler為例)
              1. 先stop服務: sudo systemctl stop devstack@n-sch.service
              2. 設定pdb: import pdb; pdb.set_trace()
              3. 手動啟動服務來偵錯:  /usr/local/bin/nova-scheduler --config-file /etc/nova/nova.conf
            • Remote